Showing posts with label tutorial. Show all posts

Saturday, October 13, 2012

House Sign

Where we live, our house isn't marked very well. It's a little difficult to explain to friends which house is ours because we have a long, winding driveway with no marker indicating our house number.

So we made one. :)


This was really simple...

What to do...


I got two pieces of wood from Lowes: one 8 inch piece and one twelve inch piece.

We then painted them with some red paint we had on hand from when we painted our futon frame for the studio.


While those dried, I designed a stencil in Word with our house numbers and last name. This was basically all trial and error. I'm sure there is an easier way our there to do it, but I was too lazy to find it.

I placed each stencil on top of the corresponding wood pieces and traced the numbers/letters with a ball-point pen, pressing really hard so it would indent the wood a bit.


Next up - paint the numbers/letters with a Sharpie paint pen. That thing is amazing and was much easier to use than paint and a paint brush. Love it and will use it forevermore!


Let that dry and then spray with a waterproof sealer to protect it from the weather.

Last thing was to attach it to a garden stick with some nails and hammer into the ground at the end of our driveway!


We finished it just in time for the get together we had the next night, and our friends all said it was helpful, even ones who had been here previously!

{Also, while we painted the wood, we decided to make another one of these candy jars for our kitchen. It turned out great!}

Enjoy!


P.S. - Sorry the pictures aren't the best - they were all from my iPhone...

Thursday, September 20, 2012

Pinterest Hair

I have naturally wavy-to-curly hair.  I'm not sure how that happened.  It wasn't always this way - it used to dry straight.  So often times, my go-to hair style is scrunching my hair to highlight the waves/curls.  But most of the time it ends up a frizzy, hot mess (and dull and volume-less after an hour).

I walk out of the bathroom after doing my hair, and Matthew's response to my how-do-I-look question is, "Umm...will it go down and not be so...big?"  Isn't he sweet?  ;)

Anyway, I saw a pin the other day that had tips for my brand of hair, wavy-to-curly.  I read the post from this blogger mom, and it didn't seem too difficult.

So I tried it today.

sorry the lighting sucks

I'm actually really impressed with the outcome.  Usually my hair has a lot more frizz, and the curls look dried out.  My hair is actually curlier here than it usually - it's typically more wavy than curly.  And I have some decent volume with this look, also pretty atypical for my scrunched hair-do.

I'm pleased as punch.  So thanks, Mama and the Dudes!  No more crunchy curls for me!  Only soft and luscious from here on out!  ;)


Wednesday, September 19, 2012

Tutorial: "FAMILY" Scrabble Tile Wall Decor

I was inspired by this project on Pinterest the other day:

Source
And when I showed it to Chewie, he loved it.  I realized that I had the materials to make an adapted version of it.  So here it is (the tutorial is under it):


Tutorial:

Supplies you'll need are...


not pictured: tape, iron, ironing board, computer/printer
and

I nabbed two foam boards and the brown craft paper from the Dollar Tree a couple of weeks ago.
The boards are cut into 10" x 10" squares.

What to do...


Cover the foam board squares with the craft paper.  You can see how I did mine on the back here, basically how you would wrap a present (one of my favorite parts of Christmas, btw).

Cut six squares of burlap that are bigger than your foam squares.  I just guesstimated on these because I wasn't exactly sure of how I wanted to cover them.  In retrospect, I could have just cut them 12" x 12" for a good fit.  Oh well - I have an idea for the scraps.  Also, for a great tutorial on cutting scrapbook, click here.

At this point I ironed my burlap because it was super wonky.  You can see the before (on the right) and after (left).  It was much easier to work with after it was ironed.

Cut out "FAMILY" and the numbers to make stencils.  By all means, you can make your own, but I thought I'd provide mine for you in the event that you'd like it.  To access the PDF file, click here.  Each page is a 9" x 9" square, but it's the perfect size for printing on 8.5" x 11" cardstock.  I highly suggest using cardstock and not regular paper.  It's much more cooperative.  So download the file and just click print (if you're using the same dimensions [10" x 10"] for your squares).  Also, I used a sharp knife to cut the stencils out, and it worked nicely - just make sure to put something underneath to protect your surface!

Next thing is to paint the letters onto the burlap.  I used black fabric paint from a previous burlap project.  I didn't measure this or anything, just eye-balled it.  I know, I'm super scientific about this.  But, hey, if I can do it, anyone can!  A note - I forgot to get a picture of painting the numbers on.  I just eye-balled that one too - go figure.  Hah.

The hardest part - wait for it to dry.  I painted mine before work and then finished the project when I got home.  However, they were almost dry when I left (about an hour after I painted them).  For added protection, I also ironed them with a paper towel in between the paint/burlap and iron so that it could heat set a bit.  

I used basically the same method to attach the burlap to the foam board as with the craft paper, except I hot glued this instead of taped.  I folded opposing sides first, then cut the corners off and wrapped them over.

An example of the cut corners before wrapping on both of the remaining sides.  I also ended up with little "peaks" in the very corners - I just folded those over and hot glued them down because I didn't love how they looked.  It kinded of rounded the corners, but I like the outcome.

My hubs took this picture - isn't he so artistic???  Anyhow, here's what they looked like once I finished the hot glue step.

The last step, which I didn't really take a picture of, is to arrange them however you want.  I did mine similar to the inspiration picture and just hot glued the overlapping areas.  I'm not sure that hot glue was the best option, but it's all I had on hand (and the glue gun was still hot - haha).  However, it seems like it's going to hold up decently because they're each so light.  

Since we're renters, we're going to use small command hooks to hang it on our wall - I love Command Hooks.  They're perfect for renters.  To do that, we'll probably make small loops on the back of the "F," "M," and "L" and then hang them on the hooks.  

Hope you love it as much as we do!  The whole project took me about 2 hours, excluding paint-drying time. Good luck!


Monday, August 6, 2012

Tutorial: Burlap & Twine Bunting


I whipped up this cutie in about an hour and with supplies I had on hand.  It's now gracing our entertainment center.  Love it.  

So here we go...

Materials:
Burlap
Twine
Scissors
Needle with large eye (not quite yarn size, though)
Hot glue gun
Ironing board & iron (optional)


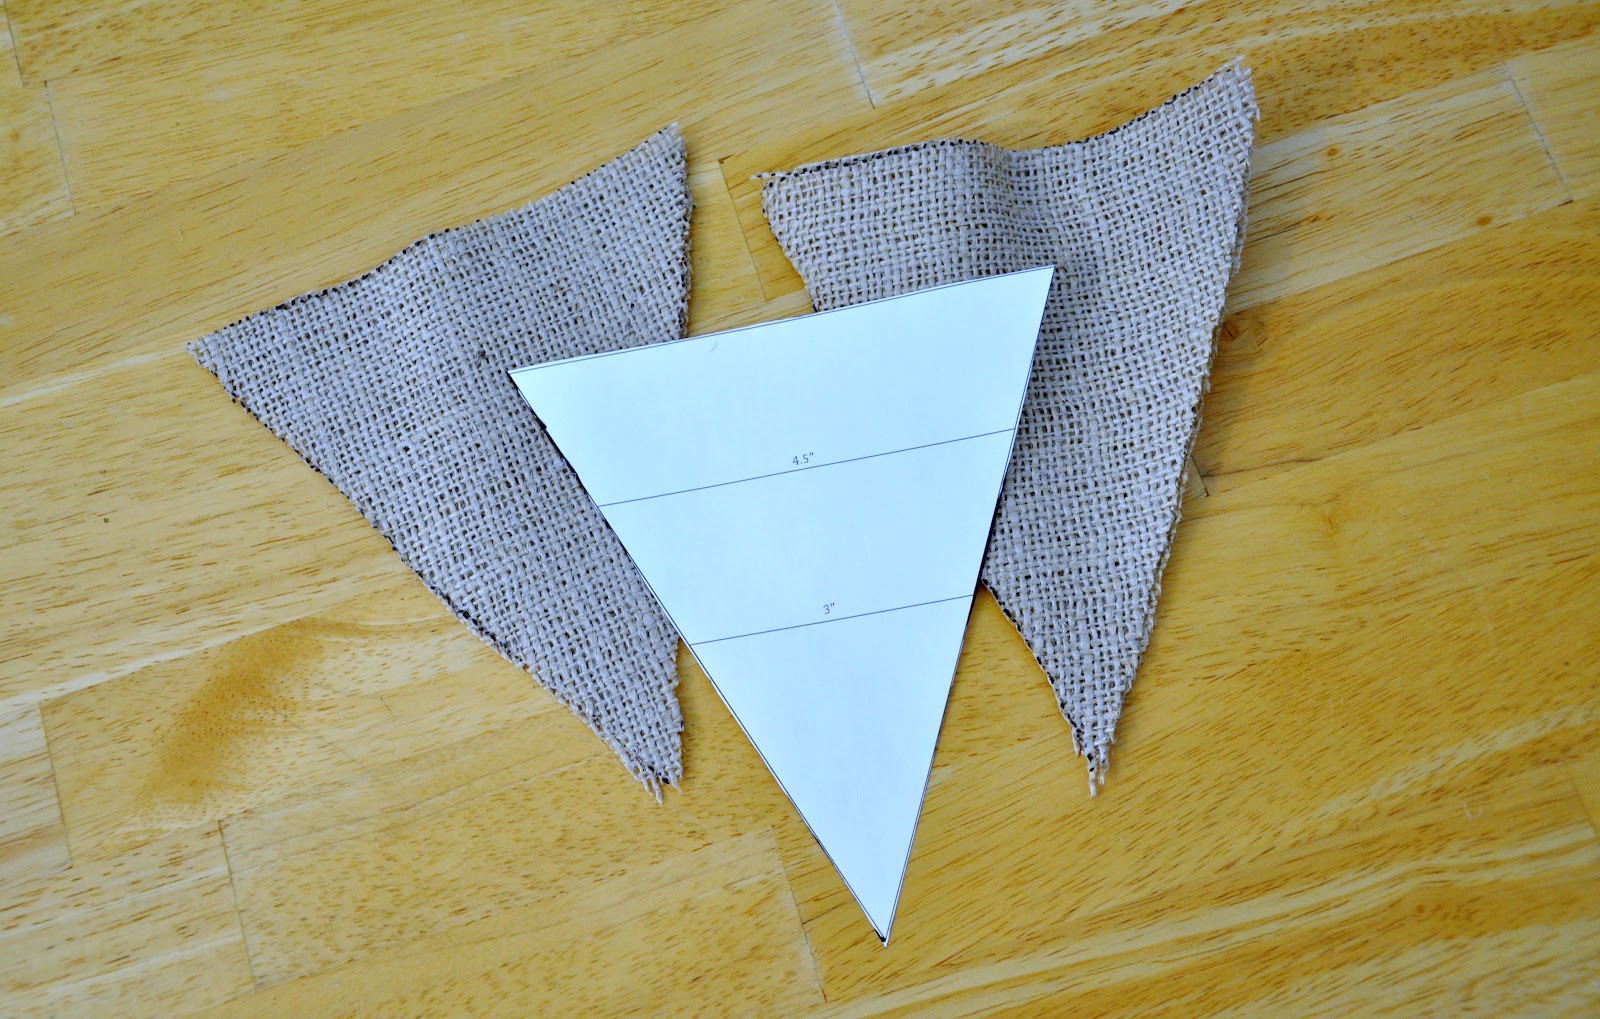
First thing's first, cut out whatever size triangles you'd like to use.  I found this perfect template on Pinterest earlier today and used the 6" size (next to biggest).  I decided I wanted 5 triangles to hang from the twine, so I cut 10 triangles.  This step isn't technically necessary, but I wanted it to look a little more sturdy.


Next step is to hand stitch the triangles together, making 5 total.  If you decide not to make yours double thickness, you can just hand stitch around the perimeter to get the same look.  Personally, I love the look of the twine stitching.


My triangles were quite wrinkly because my burlap stash has been folded up in storage for a while now.  So - if yours are like mine - run a quick iron over them just so they lie flat (mine didn't take much time at all, just a few seconds each).  


Using more of your twine, string the triangle flags together and decide how long you want it to be and how far apart you'd like your flags to hang.  I just eye-balled it because I am too lazy to measure.


Once you figure out how you'd like them to hang, hot glue the twine in place on the back of each flag in the corners.  I'm pretty sure this step can be skipped, but I wanted to make sure mine stayed put.  (PS - I had a fun time figuring out how to take this picture because I'm not left-handed and needed my right hand to click the camera button.)


Last thing to do is hang it!  I used some mason jars, dollar tree glass stones, and candles from one of my bridal showers that we had around our house to hang ours.  Unfortunately, the lighting in our living room is pretty lousy, so I don't have any pics of it hanging from the entertainment center.  I figured the deck out front would do for pictures though.  :)

I might embellish them later on for the different seasons using some velcro so that I can interchange them for each season, but I'm undecided on that.  Either way, it has added a nice touch to our living room!  


Wednesday, February 8, 2012

Pearl Bracelet Tutorial


I was rummaging through my craft supplies and found (1) twine and (2) plastic pearls, both from previous projects and labeled as "leftovers."  So what do I do?  Naturally, I make a bracelet.  This is so easy to do - your kids can make one if they want.

Here's what ya do:


String a pearl onto the twine and tie a knot on both sides.  Be sure to leave several inches on the end for later.


Continue to string the pearls and tie knots until you have as many as you like.  I ended up with six.  Once you've made one strand, make a duplicate.  Now you have two strands of pearls on twine.  Tie them together on the ends.  I made my knots as close as I could get them to the last knots on both strands (on both ends).


I used an old school technique to finish the bracelet - the infamous sliding knot.  Take one end of the strands and tie a knot around the other end.  Do the same with the opposite end around the first strands.  Sounds difficult, but it's not.  Check out this simple tutorial (with pictures) if you're unclear.  You can really use whatever technique you want - this is the only one I could remember off-hand.

It's a simple bracelet, but I really love the rustic feel to it, mostly due to the twine.  I also thought it might work well as a necklace - I might have to try it.  Enjoy!

Saturday, August 27, 2011

Tutorial: LOVE Wall Decor


My bare walls needed some "love" - so I made these wall hangings out of cardboard and scrapbook paper.  Call me cheap, but I "love" 'em!


  1. Cut a piece of cardboard into 4 pieces of the same size and shape.  I used the side of a cardboard box from the box fan I bought a couple of weeks ago.
  2. Cut out letter forms to use as a stencil.  I made these from white scrapbook paper.  
  3. Flip the cardboard over to the back, and lay your letters down on backwards.  Trace the letters.  The reason it's on the back is so that marks from your pencil/pen/marker are on the back and not the front.
  4. Use an Xacto knife to cut out your shapes.  (Save those extra letters for a project to be posted on The KC Experience at a later date.)
  5. Pick out paper to glue behind your letters, and glue those suckers on!
That's it!  I like to think I'm the queen of simple.  :)  To hang them, I just hot glued some gift wrap ribbon to the back sides and hung them on push pins!  I don't know about you, but I'm pretty impressed with my ingenuity. 


Tutorial: Toilet Paper Tube Flowers


Yep, I made these out of toilet paper tubes.  I know, I'm awesome.  Here's how to do it:


  1. Flatten out some toilet paper/paper towel tubes.  
  2. Cut them into equal sizes.  I cut each tp tube in 6 parts.  One cut down the middle.  Then each section into thirds.  
  3. Gather your tube sections.
  4. Hot glue or tacky glue them together into a flower.  
Easy peasy, people.  Just hot glue/tacky glue and toilet paper/paper towel tubes.  You can choose to spray paint them, but I kind of like them the way the are for the time being.  And now these adorn my wall!


Harry Potter Inspired Ripple Scarf

After my friends and I went to see the final Harry Potter film, I was moved to make a Gryffindor inspired scarf.  A couple of years ago I knitted a "first year" scarf for Chewie that turned out fantastic (I actually wore it during the movie).  But it took FOREVER to make since it was exceptionally wide for a scarf, and it was knitted instead of crocheted.  So I knew that knitting it was out of the question.

I started to crochet one like what you see in the movies, but ultimately decided to go with something different.


What do you think???  I really love it.

I used this pattern from over at Attic24 - I love her blog - as a guideline for the ripples.

It measures about 70-80 inches, which is long for a scarf, but I can't stand scarves that are too short.  Better too long than too short.

I did two rows of each color for each color stripe and added the tassels on the end for some extra flair.

Other than the fact that it's HP inspired, the other cool thing is that maroon and gold are the local high school's colors - so I can wear it to football games in the fall and show some school spirit!  Go team!

Monday, August 1, 2011

"Mr. & Mrs." Pillow Set Tutorial

I finished this project a while ago and just haven't gotten around to posting it yet.  So here goes:


I give you the "Mr. & Mrs." Pillow Set!  I've wanted to make these for SO long, and I finally did.  I love how they turned out.  I saw several people posting similar projects and knew I had to try it out (and I'm pretty sure they're an Anthropologie knock-off).

I'll tell you what I did to make mine.  It was actually relatively simple.

Things you'll need:

  • 2 Pillow forms - mine are 18' x 18'
  • Burlap - enough to cover both pillows
  • Black fabric paint
  • Twine
  • Large needle - like a sturdy yarn needle
  • Liquid Stitch
  • Pink and Blue ribbon
  • Paintbrush - I used a cheap sponge one

The first thing to do is make the actual pillowcases.  I cheated and used Liquid Stitch instead of sewing them.  This is a good tutorial to follow - it's a tutorial to sew the pillow cases, but you can adjust it for the Liquid Stitch.  But first...


I wanted the edges on the outside of the pillowcase (on the back) to be a little nicer than what the Liquid Stitch allows.  So I used twine to hand stitch a seam along the edge (just fold it over and stitch).  Then I took the blue/pink ribbon and hand stitched those into the seam.  It's not as difficult as it sounds.  Hopefully the picture helps explain that some.

Ok.  So once you've done the edges (if you want), make the pillow case.  It's simple, and Liquid Stitch is forgiving for a little while if you make a mistake.  Allow to dry completely.


(You should end up with something like these.)

Next you're going to make a stencil for the pillowcases.  For the words - I used WordArt in Microsoft Word and used a font and size I thought would work well for my pillow.  This part is really up to your taste.  Just make sure it's big enough to use as a stencil.  Print it out and cut out the letters for a makeshift stencil.  Sorry that I don't have pictures of my ghetto stencil for an example.  

Make sure you insert cardboard or some other thick paper in the middle of your pillowcases so the paint doesn't seep through to the other side.


Secure the makeshift stencil onto the pillowcases using tape, and then paint the words onto the pillowcases. Allow to dry completely.  (I know - it's hard to wait...)  

(I made another pillowcase out of some other fabric I had on hand while I waited for the paint to dry!)


Last thing to do is insert the pillows.  And there you have it!  I'm thinking about making a few more sets for wedding/anniversary gifts because I have extra burlap and extra pillow forms.  I can't wait to use mine in wedding pics one day.  Whenever that is.  Haha.  

Happy crafting!